iPhoneアプリにiAd広告が出るようにしてみた
echofonのiPhoneアプリなどでも画面の上のほうに広告バーが出ていますが、あれを自作アプリに表示させてみました。
普通に出すだけならもう少し単純なんですが、
TableViewを使っている画面の下部分に常に出るようにしたかったので、
スクロールしても画面の外に出ていってしまわないように座標計算と再計算タイミングをちょっと工夫をしました。
※あと、なんか読み込み前の広告バナーは画面外に出しておいた方がいいらしいので、そうしています。(Appleの審査の時に見られるのかな?)
読み込みが成功したら実際に表示したい場所へ配置しています。
・hファイル
#import <UIKit/UIKit.h>
#import <iAd/iAd.h>

@interface PanelTableViewController : UITableViewController <ADBannerViewDelegate>

@property (retain, nonatomic) ADBannerView *customAdView;

- (void)configureView;

@end
・mファイル
@implementation PanelTableViewController

@synthesize customAdView;

- (void)viewDidLoad
{
    [super viewDidLoad];
    [self configureView];
}

- (void)configureView
{
    // 広告バナー
    self.customAdView = [[ADBannerView alloc] initWithFrame:CGRectMake(0.0, 480.0, 0.0, 0.0)];
    self.customAdView.currentContentSizeIdentifier = ADBannerContentSizeIdentifierPortrait;
    self.customAdView.delegate = self;
    [self.view addSubview:customAdView];

    // 一番下のTableViewCellが広告バナーに隠れてしまわないように空のフッター設置
    self.tableView.tableFooterView = [[UIView alloc] initWithFrame:CGRectMake(0.0, 0.0, 0.0, self.customAdView.frame.size.height)];

}

// delegateメソッド
// スクロールされる度に呼ばれる
- (void)scrollViewDidScroll:(UIScrollView *)scrollView
{
    CGRect frame = [[UIScreen mainScreen] applicationFrame];
    float viewHeight = frame.size.height;
    float adViewWidth = self.customAdView.frame.size.width;
    float adViewHeight = self.customAdView.frame.size.height;
    float navBarHeight = self.navigationController.navigationBar.frame.size.height;
    self.customAdView.center = CGPointMake(adViewWidth / 2, self.tableView.contentOffset.y + viewHeight - navBarHeight - adViewHeight / 2);
    [self.view bringSubviewToFront:self.customAdView];
}

// delegateメソッド
// 広告バナーの読み込みに成功したとき呼ばれる
- (void)bannerViewDidLoadAd:(ADBannerView *)banner
{
    CGRect frame = [[UIScreen mainScreen] applicationFrame];
    float viewHeight = frame.size.height;
    float adViewWidth = self.customAdView.frame.size.width;
    float adViewHeight = self.customAdView.frame.size.height;
    float navBarHeight = self.navigationController.navigationBar.frame.size.height;
    [UIView animateWithDuration:2.0
                          delay:0.0
                        options:UIViewAnimationOptionCurveEaseInOut
                     animations:^{
                         self.customAdView.center = CGPointMake(adViewWidth / 2, self.tableView.contentOffset.y + viewHeight - navBarHeight - adViewHeight / 2);
                         self.customAdView.alpha = 1.0;
                     }
                     completion:nil];
}

// delegateメソッド
// 広告バナーの読み込みに失敗したとき呼ばれる
- (void)bannerView:(ADBannerView *)banner didFailToReceiveAdWithError:(NSError *)error
{
    NSLog(@"広告表示が失敗しました");
}
log4j設定ファイルで出力logのフォーマットを色々いじってみた
自分用にmemoしとく。
log4jの設定ファイル(log4j.xml) の書き方サンプルと、代表的なパターン一覧。
<?xml version="1.0" encoding="UTF-8"?>
<!DOCTYPE log4j:configuration SYSTEM "log4j.dtd">

<log4j:configuration xmlns:log4j='http://jakarta.apache.org/log4j/'>

<!-- (1)appenderの設定 -->
<appender name="FILE" class="org.apache.log4j.FileAppender">
  <param name="File" value="log.txt" />
  <!-- (2)layoutの設定 -->
  <layout class="org.apache.log4j.PatternLayout">
    <param name="ConversionPattern" value="%d [%p]:%c:%m%n" />
  </layout>
</appender>

<!-- (3)categoryの設定 -->
<category name="sample">
  <priority value="info" />
  <appender-ref ref="FILE" />
</category>

</log4j:configuration>
上記のフォーマットでのlog出力結果例
2012-12-02 20:49:33,821 [WARN]:sample.ExLog1:エラー:java.io.FileNotFoundException: test.txt (No such file or directory)
2012-12-02 20:49:33,824 [INFO]:sample.ExLog2:変数は10以上です。
■代表的なパターン一覧
%c ログ出力が行われたlogger名を出力。
%C クラスを出力。
%d 日時を出力。「%d{yyyy/mm/dd HH:mm:ss}」といった詳細指定も可能。
%F ファイル名を出力。
%l ソース名や行といった呼び出し位置を出力。
%L 行番号を出力。
%m メッセージを出力。
%M メソッド名を出力。
%n 改行文字を出力。
%p ログのレベル(Fatal/Errorなど)を出力。
%t ログを生成したスレッドを出力。
%x スレッドのNDC(ネスト化診断コンテキスト)を出力。スレッド固有の情報(セッションIDなど)を埋め込むことが可能。
※高負荷のパターン
%C、%F、%l、%L、%Mの場合は処理負荷が高くなるため必要な時以外は使用しないように注意が必要。
macのeclipseでjadを使いたい
windowsのeclipse pleiadesだと入ってるんですが、mac版eclipseには標準でjadclipseが入ってなかったので入れました。
jadというのは、デコンパイラです。
コンパイルされているライブラリのコードなどをデコンパイルして読むことができるというやつです。
下記ブログ記事参考にさせてもらいました。
MacでEclipseでjadとJadclipseインストール - memoっとく
↓ここからjad本体のダウンロード
JAD Java Decompiler Download Mirror
Jad 1.5.8g for Mac OS X 10.4.6 on Intel platformをダウンロード。
macのバージョンは多少合ってなくても気にせずに。
↓次に、jadclipseのダウンロード
JadClipse - Eclipse plugin | Free Development software downloads at SourceForge.net
jarをeclipseのpluginsフォルダに追加してeclipse再起動。
Preferences > Java > Jadclipse
→Path to decompiler:にjad本体のパスを設定
以上。
macのeclipseでsysoutと打ってSystem.out.printlnを出したい
Macでeclipse使ってjavaを書いていると、sysoutと打ってctrl+SpaceをしてもSystem.out.printlnになってくれない。
というか、画面右上のSpotlightっていうmacの検索窓が出てきます。。
これはeclipseのキー設定を変えることで解消できます。
eclipseメニューバーの 環境設定 > General > Keys
→一覧から「Content Assist」を選択
→「Binding」に[^Space]以外の好きなショートカットを実際に打ち込む
(ちなみに最初、[⌘Space]としようとしましたが、入力文字変換が立ち上がっちゃいました。。何か別のショートカットにしましょう)
→「ok」
これで無事sysout変換できるようになりました。
xcode4.5にアップデートしてiOS Simulatorで動かす時にハマったよ
xcodeをアップデートして困ってググったのでメモしておく。
xcodeをApp Storeからアップデートしたんですが、既存のiOSプロジェクトを開いて実行しようとすると、
Xcode cannot run using the selected device.
No probisioned iOS devices are available with a compatible IOS version. Connect an iOS device with a recent enough version of iOS to run your application or choose an iOS simulator as the destination.
こんなエラーが出てきて、iOS Simulatorで動かせなくなってました。
iOS Simulatorはもう既にインストールしているのですが、ビルドのターゲットを見るとiPhone Simulatorが選択できませんでした。
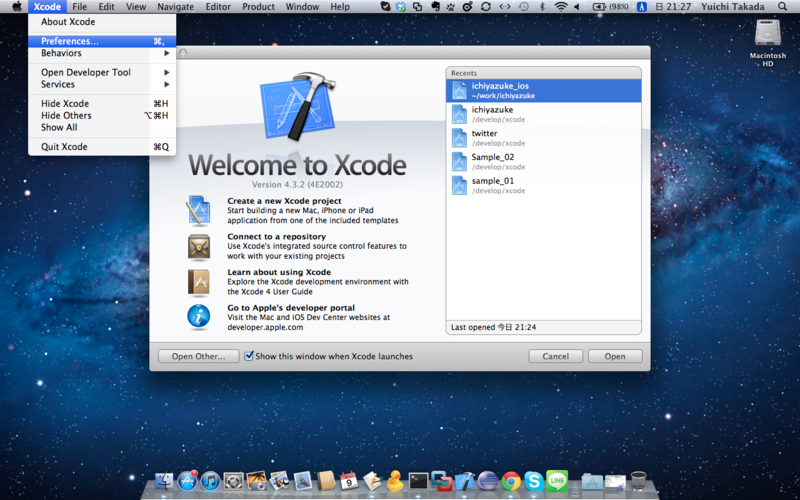
メニューの
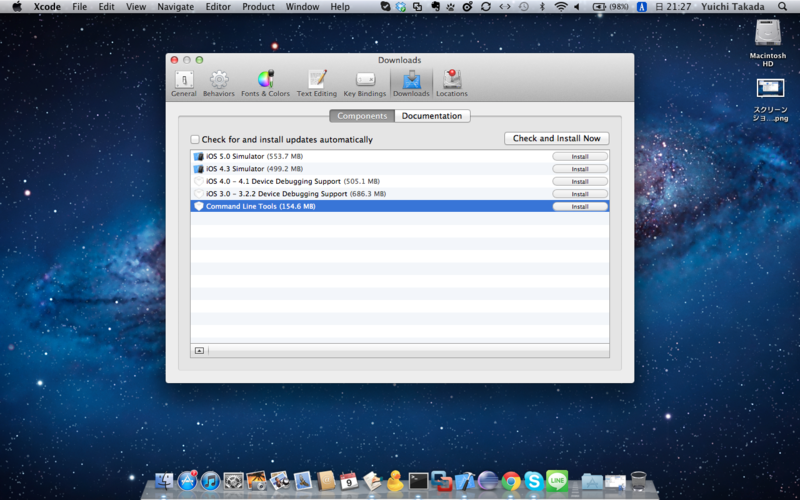
Xcode > Preferences > Downloads
を見てみると、iOS Simulator 5.1 など複数のシミュレータがダウンロード可能となっていました。
あやしい。
これをインストールしてみることにしました。
すると、まずMacBook自体のマシンのユーザパスワード入力を求められ入力。その後、AppleIDの認証が出てきました。
何も考えずに入力すると、認証に失敗。
実は僕の場合、普段使っているAppleIDとは別のアカウントで、Apple Developer登録しています。
それを忘れていて、普段使っている方のAppleIDでダウンロードの認証を入力してしまいまして、認証に失敗してしました。
気を取り直して、Apple DeveloperのIDとパスワードを入力しようとしたんですが、
hoge@hoge.com[先ほど間違って入力したAppleID] is not a "Registered Apple Developer"
という警告が出て、Apple DeveloperのIDを入力できない状態になってました。
困ってググって下記を参考に解決しました。
http://stackoverflow.com/questions/7997317/
この問題の解決方法は、
1. Xcodeを終了する
2. アプリケーション > ユーティリティ > キーチェーンアクセス を開く
3."daw2.apple.com ([your Apple ID])"という名前のキーチェーンを探す。種類はインターネットパスワード。
4. そのキーチェーンを削除する
5. Xcodeを開き、ダウンロード
すると、またApple Developerの認証入力画面が出てきてくれるので、今度は正しいIDとそのパスワードを入力すると、
iOS Simulatorを無事インストールでき、アプリケーションも実行できました!
Mac OS X lionにgitインストール
Mac OS X lionにMacPorts使ってgitをインストール。
なんですが、僕は以前、gitをソースからコンパイルしてインストールしていたので、もうgitは使える状態でした。
ただ、MacPortsからインストールし直したかったので、既存のgitを消してMacPortsからインストールし直してみました。
もう既にgitをガンガン使っている方は、このgit入れ直しはやらない方がいいかもしれないです、自己責任でお願いします。
参考
・MacPortsでgitを入れ直す
http://kyow.cocolog-nifty.com/blog/2010/12/macportsgit-92f.html
以下手順。
まず既存のgitディレクトリをどこかへ退避します。
$ which git
/usr/local/git/bin/git

$ mv /usr/local/git /home/takadayuichi/work/git.old.20120909
$ git status
bash: git: command not found
$ which git
$
これでやっと気を取り直してMacPortsからgitをインストール。
$ port search git-core
git-core @1.7.11.5 (devel)
    A fast version control system
これですね。git-core。
$ sudo port install git-core
Warning: The Command Line Tools for Xcode don't appear to be installed; most ports will likely fail to build.
Warning: See http://guide.macports.org/chunked/installing.xcode.html for more information.
--->  Computing dependencies for git-coreError: Unable to execute port: can't read "build.cmd": Failed to locate 'make' in path: '/opt/local/bin:/opt/local/sbin:/bin:/sbin:/usr/bin:/usr/sbin' or at its MacPorts configuration time location, did you move it?
なんかWarning出ました。
まず Command Line Tools for Xcodeをインストールしなさいよ、と言っています。
参考記事
・[Mac]Xcode+MacPortsの導入方法(SnowLeopard,Lion対応)
http://dmnlk.gehirn.co.uk/?p=139
Command Line Toolsは、xcodeのここからインストールします。
Xcode > Preferences > Downloads > Components > Command Line Tools


インストールが無事完了したら、ようやくMacPortsからgitのインストールです。
$ sudo port install git-core
Password:
--->  Computing dependencies for git-core
・
・
・
--->  Cleaning git-core
--->  Updating database of binaries: 100.0%
--->  Scanning binaries for linking errors: 100.0%
--->  No broken files found.
[takadayuichi@takada-MacBook-Pro:~]$ git --version
git version 1.7.11.5
[takadayuichi@takada-MacBook-Pro:~]$ which git
/opt/local/bin/git
無事完了。
エラー対処:unrecognized selector sent to instance
こういうエラーが出た時の対処法。
[NSCFNumber isEqualToString:]: unrecognized selector sent to instance
代入したNSString型のquestionIdを参照する際にエラーになって困ってました。
下記で解決。
NSArray *questionIds = [parser objectWithData:response];

for(int i = 0; i < 9; i++){
    // 修正前(エラー)
    //NSString *questionId = [questionIds objectAtIndex:i];

    // 修正後
    NSString *questionId = [NSString stringWithFormat:@"%@",[questionIds objectAtIndex:i]];
}